Be sure that the desired location of fence lines does not exceed property lines. This is very important. We recommend that all posts be set approximately 4" inside of the property line to avoid encroaching on adjoining property with the concrete foundations. Stretching string or chalk lines on the property line and setting posts approximately 4" inside of them may do this.
Homeowner/Customer is responsible for contacting BC One Call (1-800-474-6886, www.bconecall.ca) for all underground utilities on property.
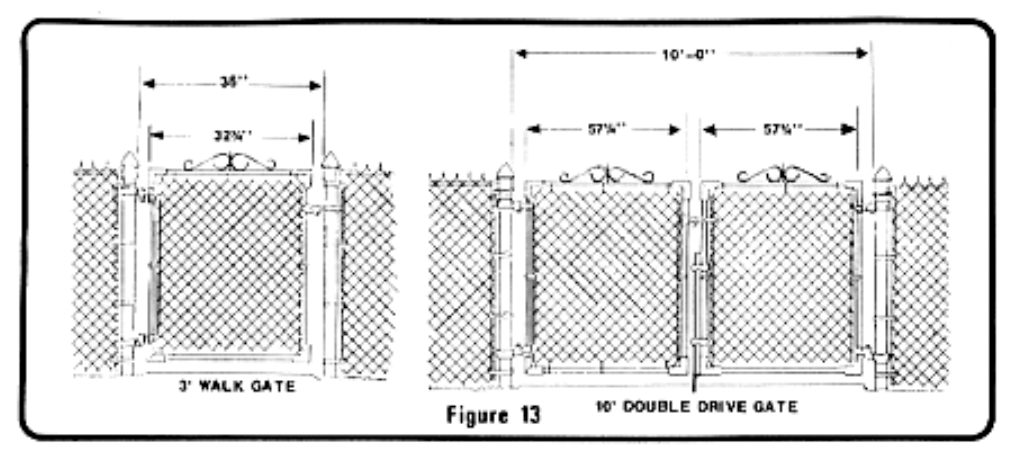
First, determine the location of end, corner, and gate posts (which are referred to as terminal posts). Distance between gate posts is determined by adding the actual width of the gate to an allowance for hinges and latches. Single walk gates require 3-3/4" for hinges and latches and double drive gates require 5-1/2 ". For example, a 3-foot walk gate should measure 32-1/4" wide. Adding 3-3/4" to the width means that the distance between posts (inside face to inside face) should be 36". (See Figure 13)
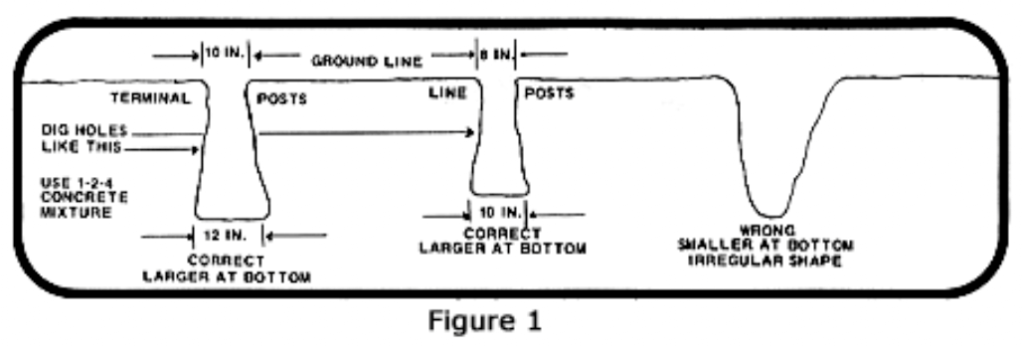
Now, dig the holes as shown below in Figure 1. (To determine depth of hole see Figure 2 - Measurement C)
Warning: When digging post holes watch for and check out any underground cables or pipe lines and contact your local utility.
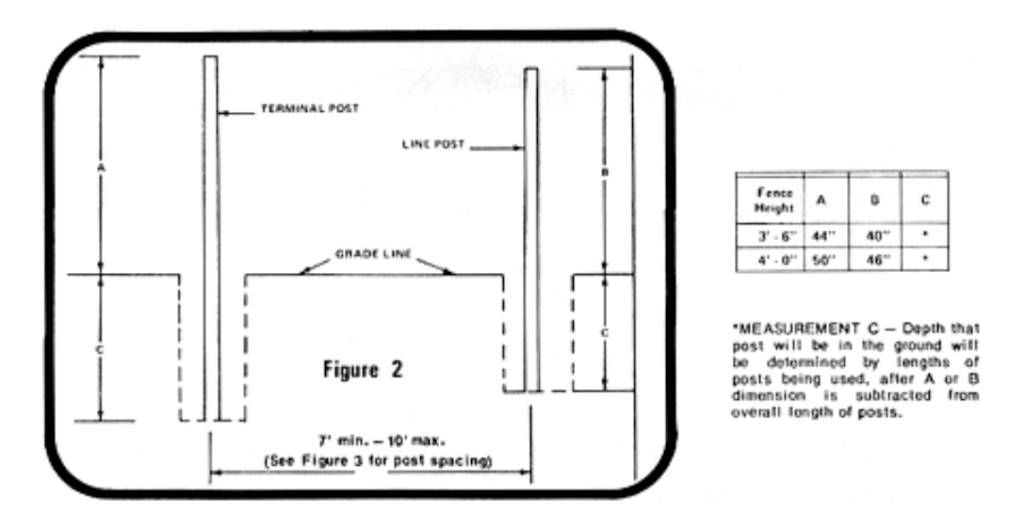
Next, mark all posts with crayon or chalk for the correct height of fence you are installing (see Figure 2 below). Terminal posts should be set 2" higher than the width of the fabric and line posts 2" lower than the fabric width.
Set the terminal posts in concrete using a concrete mix as follows: 1 part cement, 2 parts sand, and 4 parts gravel. Mix a fairly heavy solution as too much water weakens concrete and may cause cracking. Use a carpenters level to set posts plumb. Crown all post footings for water drainage by sloping concrete away from post.
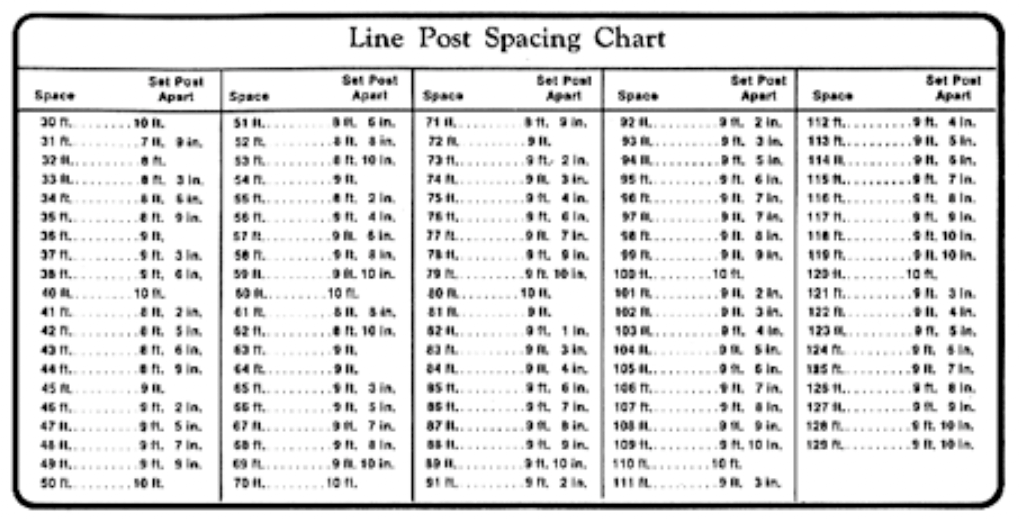
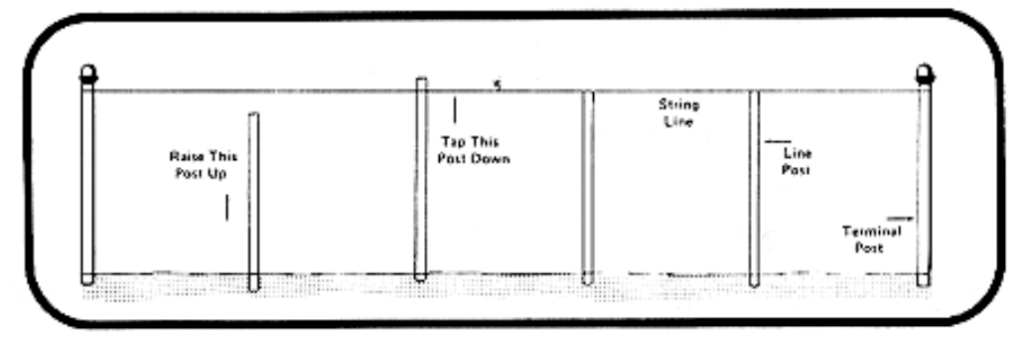
Mark the grade line on all line posts measuring from the top down as shown in Figure 2. Then measure the distance between terminal posts and check line post spacing chart (Figure 3 below) for exact distance to allow between line posts.
Next, stretch a masons line from outside of terminal posts to outside of terminal posts (be sure the concrete has set up sufficiently so as not to lose plumb). The line post holes should be lined up so that when they are set in the center of their holes, their centers will line up with the terminal post centers. This means the outside faxes of the line posts will be about 1⁄4" inside of the line stretched between the outside of the terminal posts. Now dig the line post holes and set the line posts.
Check material list and fittings identification chart. After the posts have been installed and the concrete allowed to set, slip tension and brace bands on terminal posts. (See Figure 5). The tension bands should be spaced approximately 10-12" apart. Do not spread or distort bands. All bolt heads for bands are on the outside of fence and the threaded ends are on the inside. Then apply all terminal post caps.
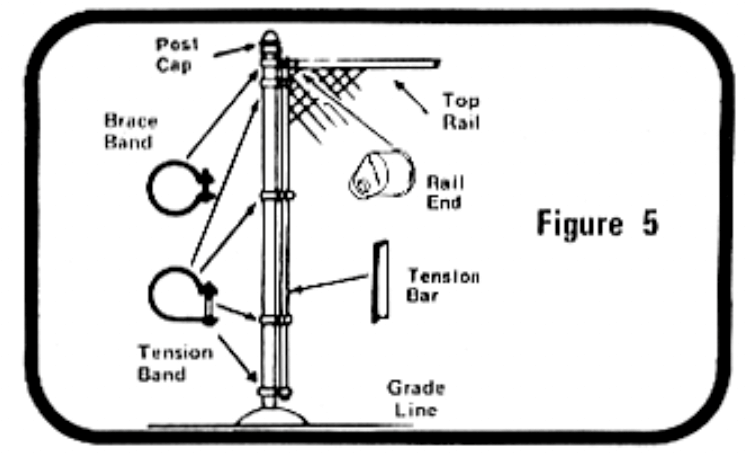
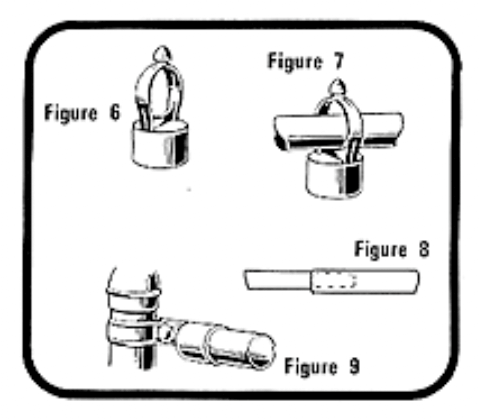
Next, attach loop caps. (See figure 6). They are set with the top rail hole offset toward the outside of the fence making flush the outside face of the top rail through the loop caps. (see figure 7). Join the top rail with wedged end where required. (See figure 8). End of the top rail fits into rail end fittings on the terminal post. (See figure 9).
After assembling the framework, unroll the fabric on the ground along the fence line starting at a terminal post. Then slide tension bar thru the last link in your fabric, and attach this combination to the terminal post using tension band and bolts provided. (See figure 10). If more or less fabric is needed to span the opening, an additional amount can be connected or removed as shown in Figure 11. The fabric should be on the outside face of all posts with either the knuckled or twisted edge at the top as desired, and loosely attached to the top rail by a tie wire.

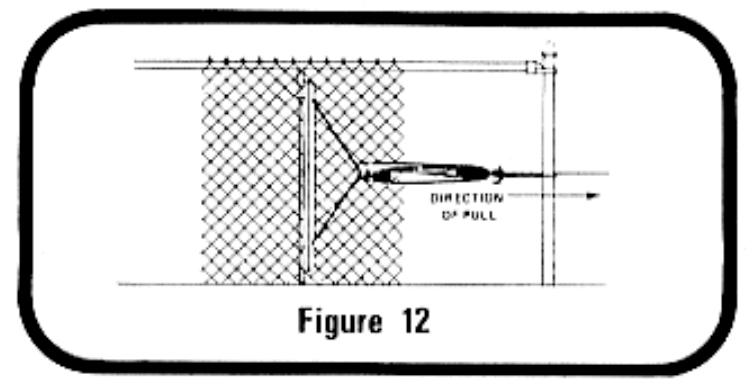
Fabric should be stretched from the terminal post already attached to the opposite terminal post. Insert tension bar in end of fabric and attach fence stretcher to bar (ratchet type power pull, large carpenter's clamps, block and tackle, or similar devise may be used. Most wire stretching tools of this type can be rented or borrowed locally).
As you stretch the fabric test it for tension (it is stretched enough when it gives slightly). The top of the fabric should be located approximately 1⁄2" above the top rail to insure proper height. After fence fabric is sufficiently tight, remove the excess the excess fabric as shown in Figure 11, and connect the tension bar to the post with tension bands. Also fasten the fabric to the top rail ad line posts with tie wires spaced approximately 18" apart.
After the entire fence has been completed, apply male hinges to one of the gate posts, hanging the top hinge upside down thus preventing the gate from being lifted off. Loosely apply female hinges on the gate frame and slop them onto the male hinges that have been installed on the gate post. Set hinges to allow for gull swing of the gate and align the top of the gate with the top of the fence. Tighten all hinges securely. Install gate launch for single gates. For double gates, use the sample procedures as on walk gates but install center latching device (fork latch).
Land Acknowledgement
Nordic Industries Ltd acknowledges it is situated on the traditional territory of the W̱SÁNEĆ people which includes W̱JOȽEȽP (Tsartlip) and SȾÁUTW̱ (Tsawout) First Nations.